Saturday, February 28, 2009

Thrifty Treasures


I promised I would share my latest thrifty finds with you, and since I haven't had a chance to do any sewing this week, I guess now is as good a time as any.

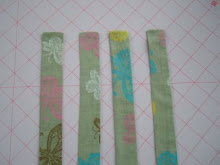
I found a couple of vintage sheets that I see becoming pajama bottoms for me and maybe a night gown for Sara Lynn. The one with the blue butterflies and orangey-red poppies is my favorite. But, my best find had to be the pie plate.

That pie plate totally made my day. I love it, really I do. You can see printed on the plate a pecan pie recipe with very retro art of the ingredients. I have already used it to make a pecan pie (my husband's favorite.) It looks absolutely amazing with the golden brown edges of the plate peeking out from under the pie crust.

And the icing on the cake is that I have a gorgeous pumpkin-orange pie plate that my mother in law gave me. It has been in the family for years. It has the very same scalloped edging, and I can just see them with their pies (one pecan and one pumpkin, of coarse!) I even have a wrought iron two-tiered pie holder that will look smashing housing the duo. I almost wish we could have a Thanksgiving "do-over" just to be able to bake those pies!


On another note, my husband laughed at me when I took a picture of our favorite enchiladas last weekend. Partly because he had already sneaked a bite out of the corner. :) They trully are a family favorite... both kiddos love them. And they're soooo easy!

If you look carefully, you can see the bottom of my two-tiered pie holder in the picture above. When it isn't holding pies, I can't bear to put it away in a cabinet. It's much too beautiful. I opt instead to have it out displaying our fresh fruit.

EASY ENCHILADAS

1 lb. ground beef (or turkey)
1/2 medium onion, diced
2 cans enchilada sauce (I use Old El Paso)
10 flour tortillas (or corn if you prefer)
8 ozs. shredded cheese

Garnish
Sour Cream
Olives
Lettuce
Salsa
Guacamole

Preheat oven to 350 degrees. Brown and crumble ground beef with diced onions added in beforehand. Drain excess fat. Add one can of enchilada sauce into the meat mixture. Grease a 9 x 13 Pyrex dish and roll 10 flour tortillas with an even amount of meat mixture. Place in the dish and top with reaming can of enchilada sauce and shredded cheese. Bake for 30 minutes or until cheese is bubbly. Serve with garnish as desired.


Thursday, February 26, 2009

Surviving the Frost


I am relieved to report that my garden has survived the frost we experienced last week. And thankfully, temperatures have been much more comfortable this week - back in the 60's and 70's for highs where my strawberries seem more comforatable.


My onion transplants are looking quite scraggley since the frost. Even though I covered them with plastic which served as a makeshift greenhouse, they just do not seem to have fully recovered. I'm hoping the bulb of the onions are faring better than the tops.


The other veggies seem to be faring better. My sugar pod peas, broccoli, cabbages, swiss chard, and carrots remain unfazed. They have sprouted and seem to be thriving in spite of the freeze last week. I check everyday to see what else is sprouting. I'm awaiting lettuce, radishes, turnips, rutabagas, and mustard. I can hardly wait until it's time to plant some warmer weather vegetables.

Wednesday, February 25, 2009

Another fabric giveaway in blogland!

I stumbled across a great new blog recently, and it is definitely a source of sewing inspiration.

Jessi of Jump up and down is an amazing mother and seamstress. Her blog is just beautiful and she has posted a couple of great tutorials, including the one I use for making ruffles (look for it in the right-hand sidebar.)

She is having a scrappy fabric giveaway this week, so hurry over! If you mention that you were referred to her by Melissa Sews, I'll get an extra entry...
Justify Full

Monday, February 23, 2009

Neglected Patterns


Recently, I told you that I rarely sew for myself. But, I admit that I often dream of sewing up beautiful garments to carry or wear that are all my own. Hence, the many Amy Butler patterns that live in my stash. I've had them tucked away in a drawer for so long that I almost forgot about them. I stumbled across them last week and immediately gravitated toward the Barcelona Skirt.


I chose some fabric from my stash (wishing I had enough Amy Butler yardage, but I don't) to make the layered version of the skirt. I'm in love with the exposed raw edges of the layers.


And you've probably noticed, I do not attempt to craft without a warm beverage within arms reach. This time I settled into my crafty chair with chai tea. Oh, so yummy!


I would love to tell you that I completed the skirt, but the truth is I didn't get very far. I have all of the pattern pieces cut out, which is the part I like the least. So that's good. But just as I was about to get to down to business, Sara Lynn woke up from her nap and it was all she wrote. I expect to be more productive when it's time to put the pieces under my presser foot (probably this weekend.)

A little thrifting expedition also interrupted my weekend craftiness, and I didn't mind a bit. I'll share my latest treasures with you soon.


Friday, February 20, 2009

I had to tell you...

Varenia is having a fabulous giveaway over on her blog Play is the Thing.

You do not want to miss this one.

She's giving away one of her custom "Ruffler Dresses" in the size of your choice.

Gorgeous... Check it out already!

Thursday, February 19, 2009

Dreaming...


...of an herb garden nestled in a cozy spot along side poppies, sweet peas, zinnias, sunflowers, and the like... maybe a tomato or two slipped into the mix... I can almost see it now...


...and perhaps an Amy Butler Barcelona Skirt is in order for the occasion. I think so. I couldn't possibly stand in my beautiful herb garden wearing anything else. I very rarely sew for myself, but that's about to change around here. I need that skirt. After all, I've had the pattern for over a year. It would just be wrong to keep it tucked in that drawer any longer...


“Dear friends, since God so loved us, we also ought to love one another. No one has ever seen God; but if we love one another, God lives in us and his love is made complete in us.”- 1 John 4:11-12

Sunday, February 15, 2009

Butterick 3477 - Fast and Easy Girl's Dress


This pattern is very similar to a swing top I made for Sara Lynn last spring. It was easy enough to sew up, and I completed it in an afternoon, except for the slip-stitching that is used to sew the lining of the bodice to the ruffled bottom of the dress. If you do not like to do sewing by hand, this may not be the pattern for you. It took about an hour to finish the slip-stitching.

I am very happy with the way the dress turned out. I sewed a size 4 for my daughter who is currently wearing a 3t. It should be perfect by the time it warms up enough for her to wear it this Spring. Included in the pattern package were sizes 2-3-4-5.

This pattern has instructions for sewing two variations of dresses, two different tops, a pair of capris and shorts. Very versatile. The instructions are a little sparse, so it may be a bit tricky for beginners. You need to know how to sew ruffles before tackling this one. (I like this tutorial for sewing ruffles.)

All things considered, I would definitely recommend Butterick 3477 to you if you have a little girl to sew for...


And I forgot to take a shot of the inside seams - they are soooo neatly finished! I am loving my new serger. No more zig-zag finishing for me.

Saturday, February 14, 2009

A Beginner's Sewing Tutorial: How to turn straps


This is a really simple sewing tutorial. If you are a seasoned seamstress, feel free to skip this post. But if you are new to sewing, this is an easy tutorial that will save you the pain of figuring this out on your own.


Yesterday, I was working on the Butterick 3477 pattern (I'll post pics soon) when I remembered my first experience making straps. I had no idea what I was doing. I naively thought the pattern would explain the process.


Needless to say, it didn't explain how to do this. All I had for instructions:

1. Fold straps.

2. Sew seam.

3. Turn and press.

It took me way too long to figure out how to do this, so I thought I would save you the trouble. I have a fancy tube turning tool, but I have found that I prefer to use my scissors (carefully!) or a chopstick if the strap is narrow. If you are sewing spaghetti straps, you will need a turning tool to do this.

You first need to fold your strap, right sides together, and press. Sew along the edge opposite of the fold and the bottom of the strap, leaving the top open. Clip the corner of the bottom of the strap to make it lay smoothly, being careful not to clip the seam.

To begin turning, bunch the fabric at the bottom of the strap (which has been sewn.)
Carefully, use your scissors (or a chopstick) to begin gently pushing the fabric up through the strap.


Continue feeding the fabric onto your scissors and up through the strap until you can see the bottom of the strap peek through the hole at the top.


Holding the bottom of the strap, remove your scissors and pull the rest of the fabric down.


Rub the corners to make the fabric lay nice and square. You could use your scissors to help push the fabric out in the corners, but it usually isn't necessary.

Congratulations! You have made a strap. Now press and you're done.

Tuesday, February 10, 2009

Garden Helpers


I am happy to report that one of my garden beds is now sown. We had so much fun! Daniel and his friend JT were amazing help with the planting. You can see them covering the row of peas with dirt after they put each seed carefully into place. I was impressed at the care that each of them took to give their seed a cozy spot in the row making sure that there was just enough space in between.

I ended up planting cabbage, lettuce, carrots, broccoli, onions, arugula, spinach, mustard, turnips, rutabagas, and peas. In a few weeks I'll be sowing the other bed with green beans, more peas, squash, radishes, cucumbers, and maybe some melons. Cantelope and watermelon are my kid's favorites. I'm looking forward to enjoying fresh produce from the convenience of my backyard.

You probably noticed my shabby little cabbage transplants at the bottom of the picture. I think they will be alright after a few days basking in the warm sunlight and soaking up the replenishing rain which we're expecting tomorrow. Honestly, we had a pretty severe cold front come through a couple weeks ago, just before I was ready to plant them. I had forgotten that I left them on our back patio exposed to the frost. It is hard for me to imagine now that two weeks ago we had temperatures in the 20's... I'm grateful for this February thaw!


My favorite snack lately? Cottage cheese and fruit. Any fruit. Today it was mandarin oranges, but pineapple is especially delicious, too. And I can hardly wait until my berry plants begin producing! Fresh blackberries, raspberries, strawberries, and blueberries will be on the menu soon. I also have some grape transplants to place in my little garden. I just have to figure out what kind of trellis to build before they will inhabit their new home. Any suggestions?

Saturday, February 7, 2009

Raised Garden Beds... Ready!


My garden beds are ready to be sown. Oh, how happy this makes me! One of the best things about living in Alabama is the lengthy growing season. Most early vegetables can go out in February. We are having a gorgeous weekend with temperatures in the upper 60's to low 70's (sorry to make you jealous.) I thought it was a great time to get a head start on Spring planting...


I believe I'll plant some lettuce, carrots, broccoli, arugula, spinach, and mustard for now. As soon as it warms up a bit more, I have the perfect spot for an herb garden. I can hardly wait! I am thinking about planting some peppers in containers in the same area. Maybe some tomatoes, too. I haven't quite decided. I would also love to plant some heirloom flowers there as well.
This is what everyone else was doing to enjoy the beautiful day:


A little jumping.


A little climbing.


A lot of swinging.

Hey, you guys make some room for me!

Tuesday, February 3, 2009

Serging right along


So, I finally took my Kenmore 16677 serger out of the box. I sat down with a nice hot cup of echinacea tea, and broke out the handy dandy DVD tutorial that came with the machine.


I made sure I had my scrap bowl nearby (and more tea) when I finally turned the machine on. I'm thinking, this isn't so hard. Isn't threading an inexpensive serger supposed to be difficult?


Then, I pressed the foot pedal. Uh-oh. Looking at the tangled threads, I realized I must not have threaded the machine properly afterall. I became a little discouraged, but I remembered what my mother taught me when I was growing up... If at first you don't succeed, try and try again.

Good advice.

I watched the DVD of how to thread the machine a couple more times, and tried to thread it again. Success!


It really wasn't that hard. I was missing one little loop that the lower thread goes through. Once I remedied that, it serged a beautiful seam. It was my mistake. I've also found that it helps to thread it in a particular order. Lower thread, upper thread, right needle, left needle.

I must say that I am really impressed with this serger. I got it on sale for under $200. It took me about an hour to get it up and running (including the time for watching the DVDs.) Not bad at all.

I spy... a new serger!

I've wanted a serger for soooo long. I became aquainted with one of these amazing pieces of machinery the summer before my senior year of high school when I worked in a sewing mill. To make a long story short, I sewed (actually serged) so many long sleeves onto shirts that summer that it burnt me out on the whole seamstress bit for quite some time. It was several years before I had a renewed desire to sew and my MIL gave me her old sewing machine. I have since purchased my own sewing machine (which I adore), but I haven't touched a serger since the tramatic mill experience. Until today...

I think it's about time I tried my hand at serging again. And since I have been so happy with my Kenmore 19233 sewing machine, I naturally wanted another Kenmore. I've taken the day off work to get aquainted with my new Kenmore 16677 serger machine. I'll report back any success (or failure) I experience in my latest adventure. Wish me luck!

Sunday, February 1, 2009

Easy as pie... Holly Jumper by Bonnnie Blue Designs


I love this pattern. I've blogged about it before, but I thought this easy as pie pattern deserved another mention. After all, it is resposible for bringing my sewing machine out of hibernation. This is the first project I've finished in quite some time. I finished it in about an hour. Gotta love it!


I should warn you about one thing though - this pattern runs WAY on the small side. I sewed a size 5 for my daughter who currently wears a 3t. It fits her very well with a wee bit of growing room... which is always a good thing for toddlers. Don't they seem to grow an inch overnight? I can hardly wait until it is warm enough to slip this cute dress on my little sweetie. Oh Spring, where art thou?


On another note, my husband gave me a new MP3 player for Christmas. I have yet to load any music on to it. I actually just opened the package this afternoon. Yes, I am ashamed. I believe I'll head on over to iTunes and remedy this situation... See you soon.