Showing posts with label Tutorials. Show all posts

Monday, March 15, 2010

My Favorite Whole Grain Sandwich Bread and Cinnamon Rolls (or Sticky Buns)

 050

The secret to really good whole wheat sandwich bread that is moist and soft is allowing it to rise properly. I allow this dough to rise four times. It’s also important to knead your dough long enough. This can take quite a while if you’re kneading by hand.

When I knead by hand, I knead for 15 minutes, allow my dough (and me!) to rest for 10 minutes, and then knead for 15 minutes more. These days, I prefer to use my KitchenAid’s dough hook attachment and allow it to knead for 10-15 minutes, or until the dough appears somewhat smooth and elastic.

For the 1st rise, place the dough into a bowl with a tablespoon or two of EV olive oil. Turn the dough to coat all sides, cover with a damp towel, and allow it to rise in a warm place until doubled in size, about 1 – 1 1/2 hours.

For the 2nd rise, punch dough down gently, turn it over, cover, and allow it to rise again until doubled. This usually takes half the time of the first rise.

007

For the third rise, punch dough down gently once more, divide and shape as desired (above I used half the dough for a sandwich loaf and the other half for cinnamon rolls), and place in pans, again covered with a towel, to rise until almost doubled, about 20 minutes.

The forth rise happens during the first 5 minutes of baking.

035

You can see here what a difference it makes in the final product. Mmmm….

015

I try to keep my cinnamon rolls somewhat healthy by not using too much sugar, and the sugar I use is organic evaporated cane juice. I usually use 1/2 cup of sugar and a tablespoon of cinnamon for the filling, and 8 ozs. of cream cheese whipped with 1 cup of confectioner’s sugar for the topping. Sometimes we drizzle honey over the top instead.

Feel free to experiment with your own ideas. More ideas here.

 040

Oh, my! These are sooooo delicious!

049 

Is your mouth watering yet? Mine is!

072

Here’s the recipe I adapted from Sue Gregg’s Whole Grain Baking Cookbook:

Whole Grain Dough

1 cup hot water

3/4 cup plain yogurt, whey, kefir, buttermilk,      ~ or 1/2 cup lemon juice (I prefer Stonyfield Creamtop Plain Yogurt)

4 cups whole wheat flour, spelt, or kamut  (I substitute 1/2 cup of soy flour for extra protein, and use half spelt/half wheat mix)

Mix above ingredients, cover tightly with plastic wrap, and allow to stand overnight. (This is optional, and I sometimes forget to do this the night before. The bread is still delicious when prepared the same day. Soaked grains are easier to digest.)

1 cup warm water

1 TBSP active dry yeast (or 1/4 oz packet)

1/2 tsp. honey

1/2 tsp. baking soda (added after mixture bubbles)

Mix above ingredients and let stand for 5 – 10 minutes, until frothy.

1/3 cup extra virgin olive oil

1/3 cup honey

2 tsp. sea salt

Mix above ingredients and add it, flour mixture, and yeast mixture to a mixing bowl. Knead by hand (or machine) until well blended. Turn out onto floured surface (if hand kneading) and knead for 20-30 minutes, until smooth and elastic. If kneading by machine, knead for 10-15 minutes.

1-2 cups whole wheat, spelt, or kamut flour

You may add up to 2 additional cups of flour to dough as needed to prevent sticking while kneading. I usually add about 1 cup of flour, only adding enough to allow dough to pull away cleanly from sides of mixing bowl. If you add to much flour, your dough will be dry and tough!

***Follow the directions at the top of this post for rising.

This recipe makes 2 loaves, or 1 loaf and one pan of cinnamon rolls.

Bake at 350 degrees for 35-45 minutes (or until the loaf sounds hollow when you thump it) for loaves, and 20-25 minutes for cinnamon rolls. Enjoy!

027

TIPS: If you need instructions on assembling the cinnamon rolls, try here. Instead of cutting with a knife, I use a piece of string (fishing line or dental floss work best!) slid gently beneath the log of dough, and then pulled crosswise across the top. It makes the cleanest cut. And I cook all my bread in stoneware pans. It cooks more evenly without allowing the bottom to become too brown. Don’t forget to spray or grease the bottom of your pans!

How to knead

How to shape loaves

Understanding yeast

Friday, January 29, 2010

Sewing up a storm

398

My quilt making progress was interrupted this week. But I didn’t mind one bit. These super-sweet rustic bears were a cinch to sew. It truly doesn’t get any easier than these.

I’m so tempted to sew on button eyes and embroider a curvy bear-ish smile and cutesy nose! But they’ll have to stay naked for a little while longer.

296

This Sunday at church, our children will be painting faces on theses bears and they will be distributed to a local children’s home. The Adullam House reaches out to children in our area whose parent(s) have been incarcerated, and they have many children living there at any given time. The needs are always great, but several local churches sponsor this amazing ministry.

Its important for us to realize that there is mission work to be done right here at home, as well as abroad. It’s also important for our children to be involved as we reach out to those less fortunate than ourselves. They are growing, and learning, and being shaped by their experiences each and everyday.

Okay, it’s time to get off my soap box and get on to the sewing…

313

I love seeing a big pile of fabric scraps!

317

And having the not-so-fun part of cutting behind me. (I must confess that I never enjoy the cutting.)

347

My favorite mug was filled many times. Sometimes coffee, sometimes tea.

334

Now this is fun!

336

Lots of little bears took shape this week.

382

And because I’d been a really good girl, a piece of Farmer Kim’s Apple Cake was my reward. Yum!

I’m so glad that the sweet lady who put this project together chose an easy pattern. I feel another beginner’s sewing tutorial coming on. Details are in the works and will be posted soon. This is an excellent pattern for a child’s first sewing project.

Saturday, February 14, 2009

A Beginner's Sewing Tutorial: How to turn straps


This is a really simple sewing tutorial. If you are a seasoned seamstress, feel free to skip this post. But if you are new to sewing, this is an easy tutorial that will save you the pain of figuring this out on your own.


Yesterday, I was working on the Butterick 3477 pattern (I'll post pics soon) when I remembered my first experience making straps. I had no idea what I was doing. I naively thought the pattern would explain the process.


Needless to say, it didn't explain how to do this. All I had for instructions:

1. Fold straps.

2. Sew seam.

3. Turn and press.

It took me way too long to figure out how to do this, so I thought I would save you the trouble. I have a fancy tube turning tool, but I have found that I prefer to use my scissors (carefully!) or a chopstick if the strap is narrow. If you are sewing spaghetti straps, you will need a turning tool to do this.

You first need to fold your strap, right sides together, and press. Sew along the edge opposite of the fold and the bottom of the strap, leaving the top open. Clip the corner of the bottom of the strap to make it lay smoothly, being careful not to clip the seam.

To begin turning, bunch the fabric at the bottom of the strap (which has been sewn.)
Carefully, use your scissors (or a chopstick) to begin gently pushing the fabric up through the strap.


Continue feeding the fabric onto your scissors and up through the strap until you can see the bottom of the strap peek through the hole at the top.


Holding the bottom of the strap, remove your scissors and pull the rest of the fabric down.


Rub the corners to make the fabric lay nice and square. You could use your scissors to help push the fabric out in the corners, but it usually isn't necessary.

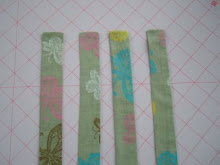
Congratulations! You have made a strap. Now press and you're done.

Wednesday, December 10, 2008

Easy Ribbed Scarf... Knitting WIP


Okay, so it's a bit wonky... well, it is my very first knitted thing ever. The fact that it is a little wonky doesn't really matter to me. I'm just excited that I've finally learned to knit.

And I must admit, it's not terribly difficult once you learn how to hold the needles. There is something soothing about the counting and the knitting and the purling. It relaxes me after a hectic day of troubleshooting computer errors.

Yes... sweet therapy. Predictable. Dependable. Knit. Knit. Knit. Then purl, purl. I don't have to think it through. And the beauty of it is that I don't have to have a tremendous amount of energy at the end of the day. I just pick up my needles and the rhythym reminds me to slow down... and breathe.


Tutorial here by Firefly.

I modified the tutorial a little by using a worsted weight wool blend yarn on size 8 needles.

And in case you need the basics on how to knit...

One more thing... introducing Cocoa! He's the latest addition to our family. We're in love!


Sunday, December 7, 2008

Learning to Knit

***This entry has been updated. I linked you to the wrong knitting tutorial in the post below. I did use the Stitch Diva for a few tips, but I found that the videos were more helpful. The video tutorials are actually located here:

http://www.knittinghelp.com/

**********************************************************

I stumbled upon the best knitting tutorial ever... it is a series of videos done by the Stitch Diva that shows EXTREMELY INDEPTH instructions and tips. I've been an avid crocheter for years, but never learned to knit. Mainly because I was never taught to knit - my grandmother taught me to crochet, but she never knit.

Sure, I've thought about learning to knit many times. But the instuctions in knitting books seemed a bit complicated, and quite frankly, made little sense to me. I am so glad I found this website. I literally learned to knit in under 30 minutes. REALLY.

I'm not an expert... yet. But with a little practice, I should be knitting well within the week. It's a simple process. And since I already crochet, the movements come quite naturally. Go ahead... give it a try:

http://www.stitchdiva.com/custom.aspx?id=101

This is what I've started knitting:

http://scrumptiousliving.wordpress.com/2007/01/25/free-knitted-scarf-pattern/

It's a very simple and easy to knit scarf. I'm loving it and I can hardly believe how easily it is coming together. I will post a photo of the project soon.


In the meantime, the Craft Addict is doing a fabulous giveaway on her blog this week - hurry on over, the contest ends December 12, 2008. You can click here to view her blog and post a comment to enter the contest. You will not want to miss this - the items above are included in the giveaway. Major crafty score! And an added bonus: she's giving a little shoutout to our favorite charities. Mine is 100x Missions which exists to glorify God through the care of orphans and the sharing of the good news of Christ around the world.

Friday, May 16, 2008

Rolled Hem Presser Foot Review


I've had this rolled hem foot (aka hemmer foot) for a while now. Unfortunately, I have yet to master the art of the rolled hem. Try as I might, I can never seem to produce consistant hems with this foot. I end up with fabric peeking through, or either I don't roll enough fabric through and the hem comes loose.


I really want to be able to use this foot. It is MUCH faster than doing a narrow hem (so I'm told.) I'm ashamed to admit it, but I've spent a total of 90 minutes fidgeting with the fabric and the foot trying to figure out where I'm going wrong... and I still can't produce a consistant hem.


See what I mean? Sometimes it's beautiful, and sometimes it's not. I found a great tutorial here that explains how to use this foot. I hope you have better luck with it!

Sunday, April 27, 2008

A Beginner's Sewing Tutorial: Baby Taggy Ribbon Blanket


Let me start by saying that the Taggies Brand blankets are protected by a patent and they may not be created for resale. I've heard that the Taggies people prosecute those who try to sell their patented products.

This tutorial is from one crafty momma to another who intends to use this blanket for her own personal use only.

I received a homemade taggy blanket as a baby shower gift for my daughter. I had never seen one before, but I loved it immediately. And I thought, that looks really simple to sew up... I bet I can figure out how to make one. It was my daughter's favorite toy for a very long time. Perfect for little hands just learning to grasp, these blankets are great for tactile development. Babies love the different textures and colors of these blankets, and they can be made in any size you desire. This tutorial was designed for those just beginning to sew, so bear with me if it seems too detailed for you.


I started with contrasting flannel fabric cut into 12 1/2 in. squares. You could use chenille or minky fabric instead, and it's better if you use 2 types of fabric (I just used what I had on hand.) A quilter's square and rotary cutter are not necessary, but they make this job much easier. Place the square on top of two layers of fabric, and cut along the edge being careful to stay against the square. (I'm making 2 blankets at one time, so I have 4 squares of fabric cut.)


Choose ribbon that coordinates (or contrasts, it's your preference) with your fabric. For my 12 inch squares (this will be the approx. finished size) I like to use 5 ribbons per side. Be creative - use different colors and textures. I use various widths of satin and grosgrain ribbons, and also something that looks almost like a wide flat shoestring/drawstring type material (I'm not sure what it's called.) I've even seen ric-rac used.


Cut the ribbon into 5 inch strips. I use the first ribbon as my cutting guide for the rest of the strips to save time. Then figure out the placement onto the blanket. I like to be sure I have a satin on each side and a wide ribbon on each side. I start with the middle ribbon placement and work my way out to the sides. Leave at least one inch between the ribbons and the sides of the blanket.


Next, fold the ribbons in half and pin them between the two fabrics with right sides of fabric together. The ribbons should be pointing inward toward the center of the blanket. This seems odd if you've never made a blanket before. But in the end, you'll see we flip the blanket inside-out to incase the seams. Trust me, it works.


After all the ribbons are pinned, put a row of extra pins marking a 3 inch spot on one of the corners which will not be sewn. This step can be omitted, but don't forget to leave this spot open. (I always get busy sewing and forget! The pins remind me.) This is the hole we'll use to flip the blanket inside-out.


Now, start sewing. I like to use a 3/8 in. seam allowance. That's about the width of my presser foot, so it's easy to follow. But use whatever seam allowance you're comfortable with, just keep it as consistant as possible. Before you start sewing, do a couple of backstitches to lock the threads. (this keeps the threads from coming undone.) Straight stitch right on top of your backstitches.


Pause when you get to the pins, removing each one as you sew. (I have a friend who just sews straight over her pins and rarely breaks a needle. I tried this once and kept breaking needles! I always remove my pins as I sew.)

When you get to the corners, stop sewing - leaving your seam allowance before reaching the end of the fabric. Lift your presser foot and turn the fabric so you can sew the other side.

When you get to the row of pins, stop and backstitch a couple stitches to lock the threads in place. Now remove the blanket from your machine and trim your loose threads where you started and ended. Remove the pins, there will be one loose ribbon that you need to set aside and attach later.

Trim the corners, being careful not to cut your stitches.

Find the hole in your fabric, and pull the entire blanket inside-out, through the hole.

Insert a closed pair of scissors into the hole and use the tip to make your corners have perfect points. (There is a tool you can buy to do this if you're afraid you'll rip your fabric. I haven't needed one. Just be careful!)

Now tuck the raw edges of the hole inside the blanket, being careful to keep the edges straight across the top of the blanket, and keep the corner squared. Iron the seam into place, and iron the rest of the blanket being sure not to touch the iron to the ribbons - they will singe! I learned this the hard way. I pull the ribbons out slightly as I iron to keep the seam from being puckered or wrinkled.


Get the last ribbon and pin it into place. You can either stitch the hole closed by hand or use your machine.

I like to use my machine. Keep the stitching as close to the edge as possible, remembering to backstitch at the beginning and end.

If you use a coordinating thread, it isn't very noticable.

Now, change your needle to a topstitching needle (it's okay if you don't have one, use the largest needle you have on hand. You can even use the needle you've been using, but the results will be a little nicer with the topstitching needle.)


This step can be omitted, but it makes the item easier to launder. On either side of the blanket, start in a corner and stitch all the way around the blanket using your desired seam allowance. Remember to backstitch at the beginning and end. Iron one last time.

One done, and one more to go!

Have fun!