

Let me start by saying that the Taggies Brand blankets are protected by a patent and they may not be created for resale. I've heard that the Taggies people prosecute those who try to sell their patented products.


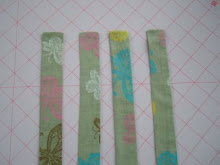
Choose ribbon that coordinates (or contrasts, it's your preference) with your fabric. For my 12 inch squares (this will be the approx. finished size) I like to use 5 ribbons per side. Be creative - use different colors and textures. I use various widths of satin and grosgrain ribbons, and also something that looks almost like a wide flat shoestring/drawstring type material (I'm not sure what it's called.) I've even seen ric-rac used.

Cut the ribbon into 5 inch strips. I use the first ribbon as my cutting guide for the rest of the strips to save time. Then figure out the placement onto the blanket. I like to be sure I have a satin on each side and a wide ribbon on each side. I start with the middle ribbon placement and work my way out to the sides. Leave at least one inch between the ribbons and the sides of the blanket.

Next, fold the ribbons in half and pin them between the two fabrics with right sides of fabric together. The ribbons should be pointing inward toward the center of the blanket. This seems odd if you've never made a blanket before. But in the end, you'll see we flip the blanket inside-out to incase the seams. Trust me, it works.

After all the ribbons are pinned, put a row of extra pins marking a 3 inch spot on one of the corners which will not be sewn. This step can be omitted, but don't forget to leave this spot open. (I always get busy sewing and forget! The pins remind me.) This is the hole we'll use to flip the blanket inside-out.

 Pause when you get to the pins, removing each one as you sew. (I have a friend who just sews straight over her pins and rarely breaks a needle. I tried this once and kept breaking needles! I always remove my pins as I sew.)
 When you get to the corners, stop sewing - leaving your seam allowance before reaching the end of the fabric. Lift your presser foot and turn the fabric so you can sew the other side.

 Trim the corners, being careful not to cut your stitches.


Get the last ribbon and pin it into place. You can either stitch the hole closed by hand or use your machine.

I like to use my machine. Keep the stitching as close to the edge as possible, remembering to backstitch at the beginning and end.

If you use a coordinating thread, it isn't very noticable.

Now, change your needle to a topstitching needle (it's okay if you don't have one, use the largest needle you have on hand. You can even use the needle you've been using, but the results will be a little nicer with the topstitching needle.)

This step can be omitted, but it makes the item easier to launder. On either side of the blanket, start in a corner and stitch all the way around the blanket using your desired seam allowance. Remember to backstitch at the beginning and end. Iron one last time.

One done, and one more to go!

Have fun!


61 comments:
I have never seen one of these before; it looks really pretty. Your choice of fabrics and ribbons are great.
What a fantastic tutorial you have presented - obviously so much time and effort has gone into this. Well done. I have never heard of a taggie until my mother made one for my baby daughter. I don't think they were very popular here in Australia but over the last 1 or so I have seen them poping up all over.
Thank you again for the lovely tutorial.
These are wonderful little projects to make! My son rubbed the satin tags on burp clothes when he was tiny, so I started making these out of fleece with just satin ribbon for him. He is now 5 and he still uses them for comfort.
Well Melissa! Now you have really done it this time... Because of you I have no time to go to the office, Movies, restaurants, visit friends or anything else!
I have become obsessed with these "Baby Taggies" from your tutorial. With so little effort I have been able to be soooo creative & have fun at the same time. I Thank you so much. You are swell!
I just discovered this tutorial...great instructions and pictures--thank you! I plan on making one soon!
Great tutorial. I have one comment which might help others because I used the closed tip of my scissors for years and ruined many items poking the tip through. Yes, you're right about there being special tools you can buy to poke those corners out but my item is free.
I started using chop sticks to poke corners out like that when I was making stuffed bears with moveable arms. I have since used them for corners and alot of other things where you need that help and have a very large collection of chop stick now since I used to pick them up everytime I ate at a Chinese restaurant. Others I know seemed to think I needed help and evidentially somehow to corner the market on those things and also started collecting for me. LOL.
VickiT
Thank you, Vicki, for your tip. I should have mentioned the chopstick method. I actually do use chopsticks when turning an item that won't allow my scissors to fit through, like thin straps.
Unfortunately, I can never seem to find my chopstick when I need it! So I resort to using my scissors which are always at arms length. I've never had a problem, but I stress that you must be careful when using them this way.
Hello Melissa,
thank you -- great instructions.
But, excuse the stupid question... how do you use this with a baby? I mean: Do you place the baby under it, or on it, or next to it? Do you have a picture of one of yours playing with one?
Thanks,
Barbara M
That's a good question! It depends on what size you make. My daughter had a small one (12 in. square) which was just right for playing with. Babies learning to grasp can easily grab hold, and they love to feel the different textures. It's a tactile development toy, really.
I also have one that is quite large, 36 inches square, which I always packed in the diaper bag. I would cover her with it, or lay her on it, and she played with it's edges.
She's 2 now, so she doesn't play with them in the same way. They've become doll blankies!
I have made lots of these types of blankets. One thing I have added is a smaller loop on 2 sides to accomodate a 'linking ring'. This allows the item to be attached to the stroller, car seat or shopping cart. This keeps their blankets from getting lost or dirty from being dropped. They can also attach teething toys, etc to the blanket for added fun!
Happy sewing!
Thanks so much! I am making one for a baby shower with leftover camoflague flannel from a quilt I made last year and making a quilt block for one side. I mught make one in pink and purple, too- in case it's a girl! This is a great way to use up some scraps and ribbon I already have - these things sell for a LOT more in stores! Great job on the tutorial! I love it!
I just stumbled across your site, this is a fantastic gift idea - everyone seems to be having babies!!
Melissa, I found your site and am thrilled that I did! It is wonderful! Your instructions are crystal clear, step-by-step, in down-to-earth, easy-to-understand English (and with wonderful color pictures, too)! I have been wanting to attempt to make a few of these for the baby showers we hold at my office, plus I want to make one for my little niece. She carries her larger blanket around EVERYWHERE, because it has the "silky" satin edge and if I make a smaller one, it would be easier for her to carry around with her. Again, thank you so much for this fabulous instructional web site!!!
I have made one of these for my sister (she is due next month) but in hers I put a plastic wipes wrapper in it for baby to crinkle. I hope the baby likes it when he gets here. I'll let you know if it's a success or a failure.
Thank you so much for posting such wonderful instructions. I am visual, so seeing the pictures were incredibly helpful. The instructions were clear, concise, so when I attempt to make this, I feel confident that it will come out well. Again, thanks so much for posting this!!!
Thanks for this tutorial, very easy to follow directions. My daughter told me about taggies but they were new to me. So i am making taggie no 4 this weekend.
Great tutorial - I'd been using instructions from another web page, and wondered whether or not I should do top-stitching. That particular tutorial didn't say to do it, but their finished product appeared to have it. Since you say it helps with the washing, I will definitely add some!
Tricia, so happy you are making taggies! They are a great little project, and so fun to whip up. The topstitching really adds to the finished piece, and helps the blanket maintain shape through the wash. And, belonging to little ones, they will be washed often!
Have been making these mainly for my daughter to use for baby gifts for her friends having babies. I try to keep pink and blue ones on hand...Also made one of animal print with gold satiny backing.They make nice affordable gifts to give and sew 'up' quickly. this weekend one of pink taggies went to a neighboring state,a nice feeling...Thanks.
I've been making these for a few years already, may I suggest a zig zag stitch on the inner seam, after the straight stitch is finished? I've found it secures the ribbon better, and prevents fraying, and eventually rips in the seams, especially if you wash them frequently!
Also, for a more fun look, I've used the zig zag stitch as the top stitch on some off my blankets.
Thanks so much for sharing! I will be trying this very soon along with a taggie ball tut I found.
terelauritsen.blogspot.com
Did you pre-wash the ribbons?
One concern some parents have with the taggies is that there have been instances when an older child would twist their finger in the loop and cut off circulation. Cook Children's Hospital in Ft. Worth suggests making the tags only 3" so a child can't twist their finger in it. They use these in the hospital for comfort for children during a procedure. They suggest satin on one side and minky type on the other for different textures. ;>) MS
Prewashing the ribbons isn't necessary, and it will probably fray your ribbons. I suggest prewashing your fabric, but not the ribbon. Once the blanket is completed, wash it before giving it to baby.
Sorry for the delay on this reply... I very rarely check this site anymore. You can find me over at: http://sweethomesteadalabama.blogspot.com
And that's a great point about the ribon lengths. : )
Happy Sewing! Melissa
I used your tutorial to make a taggie & posted pics on my blog! Thanks for the great tutorial!
www.shabbysoul.blogspot.com
I'm thrilled that you enjoyed the tutorial! These are so easy and fun to make. : )
Hi, I loved the clarity of your post and read it all. I made a patchwork version of the blanket and posted about it on the Its a Creative World blog here in the UK.
Just wanted to say thanks!
Mandy
Thank you, so much for the tutorial. With half a yard each of minky and flannel, I have been able to sew 3 blankets, and I am thinking of making a patchwork taggy blanket with the leftover material.
I blogged about this, and linked to your post at:
http://neverboringlife.blogspot.com/2011/02/yes-i-actually-like-picturestaggy.html
i LOVE this tutorial. i am making one for my sister in laws baby shower this weekend! so cute, simple, and fun! i think i'll makeone for my baby too..
i love the amount of detail and photos you've included. These are perfect gifts, functional, fun and homemade! I will be trying my first one with a little more confidence now! Thanks. April
http://aprilstarrboyd.blogspot.com
My 5 month old daughter is really interested in tags on her toys at the moment. After a search on google i found you blog. I just made a small one of these from your pattern. Thanks, it was really easy to follow and worked out really well.
I have been making the blankets for several years, but make them more personal by collecting tags and pieces of clothing from relatives and using those as the taggies. I call them "Memory Taggy's" and write a description and tell the story of each "tag". I've used military insignias, a piece of a wedding dress, a scrap of a favortie blankie from the mom and dad to be and crocheted afghans from great great grandmas. These Memory Blankets are more keepsakes than usable, the parents of the new child love them, and usually there's not a dry eye when presented.
Very cute! I made one of these for my grandson due in December. I've added this link, to both of my websites.
About Me
This is a fabulous tutorial, thank you very much! Plus, I have everything I need right in my stash!
:)
Thanks for the wonderful Tutorial! I linked up to your blog to show off your great work!
An excellent tutorial, love the wordage, pictures, VERY helpful. Thanks I've been wanting to make 1 for my new granddaughter, material in the wash, I'm ready!! Thank YOU for sharing. Diana
I just finished one of these for my granddaughter. Tutorial is great and I am really happy with the finished product. Thanks!
I just made one for my grandson. I wanted to put more than 5 ribbons on each side but did not want to deal with pinning everyone. So, I used liquid stitch to keep the ribbons folded in half and then used liquid stitch for the placement of the ribbons on the material. Thank you for such a great tutorial. :)
I just made some taggie blankets for my son and his cousins. Thanks for sharing this great tutorial! I linked back to your blog in my post. http://apple-crate.blogspot.com/2013/07/taggie-style-baby-blankies.html
This is about the sweetest pattern I've seen in a while. Thank you for sharing the pattern! bridal fabrics This will be a perfect birthday gift for my daughter.
Thank you, Vicki, for your tip. I should have mentioned the chopstick method. Great tutorial!!!
Great tutorial, such a lovely baby blanket!
Post a Comment