Wednesday, April 30, 2008

Fabulous Fabrics


I've been naughty this week... added LOTS of fabulous fabrics to my stash. I think I'm done with the vintage looking fabrics, for a little while anyway. I was so surprised when I found these fabrics COMPLETELY irresistible (bought 3 yards of most of them, oops). They're not what I'm usually drawn to, but I can already see them on my little sweetie. And maybe a skirt for me. Are matching mother/daughter outfits too corny? Gotta go sew...

Tuesday, April 29, 2008

Diet Cola Brownies


Seriously, these are some of the best low-fat brownies I've ever had! They come out really, really moist and gooey. Just like every brownie should be. And you're not going to believe how simple they are:

1 can Diet Cola + 1 box Devil's Food Cake Mix = Low-fat Brownie Heaven!

Any brands will do. I used the Pillsbury brand Devil's Food cake with pudding in the mix, and I used Diet Pepsi, but your could use Diet Coke. If you use the whole can of cola, your brownies will come out more like thick chocolate cake. If you use 10 ozs. of cola, you get the gooey fudgey brownies I have come to know and love. Cook them @ 350 degrees for 12-15 minutes.


Maybe I'm the last person on the planet to try these... Maybe you already knew the secret recipe... But I'm guessing there are a few of you out there who are in the brownie dark, just like I was. My friend Katie told me about this old Weight Watchers brownie recipe last week, and I've already made them, twice. They're that good. No one in my household knows the difference. I have to go now... and eat that brownie!

Sunday, April 27, 2008

A Beginner's Sewing Tutorial: Baby Taggy Ribbon Blanket


Let me start by saying that the Taggies Brand blankets are protected by a patent and they may not be created for resale. I've heard that the Taggies people prosecute those who try to sell their patented products.

This tutorial is from one crafty momma to another who intends to use this blanket for her own personal use only.

I received a homemade taggy blanket as a baby shower gift for my daughter. I had never seen one before, but I loved it immediately. And I thought, that looks really simple to sew up... I bet I can figure out how to make one. It was my daughter's favorite toy for a very long time. Perfect for little hands just learning to grasp, these blankets are great for tactile development. Babies love the different textures and colors of these blankets, and they can be made in any size you desire. This tutorial was designed for those just beginning to sew, so bear with me if it seems too detailed for you.


I started with contrasting flannel fabric cut into 12 1/2 in. squares. You could use chenille or minky fabric instead, and it's better if you use 2 types of fabric (I just used what I had on hand.) A quilter's square and rotary cutter are not necessary, but they make this job much easier. Place the square on top of two layers of fabric, and cut along the edge being careful to stay against the square. (I'm making 2 blankets at one time, so I have 4 squares of fabric cut.)


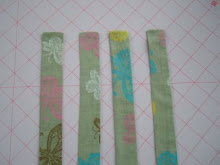
Choose ribbon that coordinates (or contrasts, it's your preference) with your fabric. For my 12 inch squares (this will be the approx. finished size) I like to use 5 ribbons per side. Be creative - use different colors and textures. I use various widths of satin and grosgrain ribbons, and also something that looks almost like a wide flat shoestring/drawstring type material (I'm not sure what it's called.) I've even seen ric-rac used.


Cut the ribbon into 5 inch strips. I use the first ribbon as my cutting guide for the rest of the strips to save time. Then figure out the placement onto the blanket. I like to be sure I have a satin on each side and a wide ribbon on each side. I start with the middle ribbon placement and work my way out to the sides. Leave at least one inch between the ribbons and the sides of the blanket.


Next, fold the ribbons in half and pin them between the two fabrics with right sides of fabric together. The ribbons should be pointing inward toward the center of the blanket. This seems odd if you've never made a blanket before. But in the end, you'll see we flip the blanket inside-out to incase the seams. Trust me, it works.


After all the ribbons are pinned, put a row of extra pins marking a 3 inch spot on one of the corners which will not be sewn. This step can be omitted, but don't forget to leave this spot open. (I always get busy sewing and forget! The pins remind me.) This is the hole we'll use to flip the blanket inside-out.


Now, start sewing. I like to use a 3/8 in. seam allowance. That's about the width of my presser foot, so it's easy to follow. But use whatever seam allowance you're comfortable with, just keep it as consistant as possible. Before you start sewing, do a couple of backstitches to lock the threads. (this keeps the threads from coming undone.) Straight stitch right on top of your backstitches.


Pause when you get to the pins, removing each one as you sew. (I have a friend who just sews straight over her pins and rarely breaks a needle. I tried this once and kept breaking needles! I always remove my pins as I sew.)

When you get to the corners, stop sewing - leaving your seam allowance before reaching the end of the fabric. Lift your presser foot and turn the fabric so you can sew the other side.

When you get to the row of pins, stop and backstitch a couple stitches to lock the threads in place. Now remove the blanket from your machine and trim your loose threads where you started and ended. Remove the pins, there will be one loose ribbon that you need to set aside and attach later.

Trim the corners, being careful not to cut your stitches.

Find the hole in your fabric, and pull the entire blanket inside-out, through the hole.

Insert a closed pair of scissors into the hole and use the tip to make your corners have perfect points. (There is a tool you can buy to do this if you're afraid you'll rip your fabric. I haven't needed one. Just be careful!)

Now tuck the raw edges of the hole inside the blanket, being careful to keep the edges straight across the top of the blanket, and keep the corner squared. Iron the seam into place, and iron the rest of the blanket being sure not to touch the iron to the ribbons - they will singe! I learned this the hard way. I pull the ribbons out slightly as I iron to keep the seam from being puckered or wrinkled.


Get the last ribbon and pin it into place. You can either stitch the hole closed by hand or use your machine.

I like to use my machine. Keep the stitching as close to the edge as possible, remembering to backstitch at the beginning and end.

If you use a coordinating thread, it isn't very noticable.

Now, change your needle to a topstitching needle (it's okay if you don't have one, use the largest needle you have on hand. You can even use the needle you've been using, but the results will be a little nicer with the topstitching needle.)


This step can be omitted, but it makes the item easier to launder. On either side of the blanket, start in a corner and stitch all the way around the blanket using your desired seam allowance. Remember to backstitch at the beginning and end. Iron one last time.

One done, and one more to go!

Have fun!

Saturday, April 26, 2008

Butterick B4783 - Girl's Swing Top


Okay, I have a new favorite pattern! I think this one came out quite fabulously, if I do say so myself. It pairs nicely with Jackie Clark's Britches and Bloomers, don't you think? I had originally intended to sew a ruffled edge to the bottom, but after trying it on my princess, I thought it would be too long.


This pattern was pretty easy. It did take me a little while to figure out what the pattern was instructing me to do, but after reading through it a couple of times I was good to go. There are 6 variations of this outfit in the same pattern package (which was part of my confusion) and it includes patterns for a top, skirt, and shorts. I purchased it in sizes 2, 3, 4, and 5 but it is also available in larger sizes.


I should tell you that this pattern runs big. Sara Lynn wears a size 2 in most clothes, but this size 2 is a bit loose on her. I'm not complaining - she's growing fast and I'd rather it be too big than too small!


I'm very happy with the way these fabrics work together. I just love vintage prints in shades of pink, cream and white. I'm having a blast dressing this little sweetie!

Thursday, April 24, 2008

Jackie Clark's Britches & Bloomers


This is my latest creation for Sara Lynn's closet. This pattern would be great for beginners because it is so detailed. I had no trouble sewing these up and this was my first time using this pattern. The ruffles were very simple to create and the elastic waistband was easy, too. You can find an excellent and detailed pattern review by Mary (aka the Craft Addict) over at Sew, Mama, Sew! Be sure to check out her blog here. It was actually her review that prompted me to purchase the pattern myself - thanks Mary!

I really like the way these bloomers turned out. They are actually pants, but the pattern could be easily modified into cropped pants or shorts. Next time, I will shorten them to just above the knee. No pants required for our steamy Alabama summers!


I've been drawn to vintage fabrics lately. They are so precious on my sweet baby girl. I think a ruffley top would pair nicely with these. We'll see what tomorrow brings...

Tuesday, April 22, 2008

My Little Garden: Before and After


Just so you know, I am in container garden heaven! I found these gorgeous pots dirt cheap (like the pun?) at Costco. Last fall I planted this bed in pansies. It was pretty, but it was a pain to weed because the bed is so wide. This spring I'm getting smart. I weeded the bed one last time, applied some weed control, and I am bringing out the pinestraw. These are the flowers previously posted here in case you're interested.


This is the before shot of my flowerbeds. I worked for two whole days weeding around our house (I'm not completely done - we live on a 1 acre lot) and removing unwanted shrubs and bulbs left by the previous owner. I wanted a clean slate to work with... and a sense of ownership to go with this house that we're still making our home. We've lived here about 8 months now, and we've completely renovated both the inside and outside of our Cape Cod style home.


For the most part, it's been a wonderful journey - taking an older home with loads of character and adding our own personality to the mix. It's a good feeling to be able to step back and see what we've accomplished with our own hands. But boy, my back hurts!

Blogger Technical Difficulties

I'm getting an error when trying to upload images. Hopefully, this problem will be fixed soon and I can post my garden's before and after pics for you to see. As you've probably noticed, I took a little sewing sabbatical so I could work in my flowerbeds. I'm almost done with my current gardening projects, so you can expect to see more sewing related posts in the very near future.

Saturday, April 19, 2008

Meet My Little Man

This is my son, Daniel. My best boy. He is growing up so quickly! I can hardly believe I have a first-grader, and he'll be seven-years-old in July. Where does the time go? He recently lost another tooth and I immediately decided it was time for a photo-op. But my son had other ideas. He's at the age where he feels like he's too big to be treated like a little kid. One day last week he announced to my husband and I that he's a man now.


Well, here's my little man with a missing tooth. He still believes in the tooth fairy. If only innocence could last forever...

Friday, April 18, 2008

Roses and Petit Fours


Have I told you how much I love this man of mine? I really do love him immensely. He is my soul mate. My bestfriend. He always seems to know what I need and goes out of his way to make me happy. One day this week he came home early and announced that it was "Happy I Love You Day." He brought me roses and petit fours - my favorite! I am a blessed woman.


Thursday, April 17, 2008

Meet My Princess


This is Sara Lynn. She is my princess, but she came into the world with the idea that she should be queen. I'm serious. She really wants to rule the roost around here. But we love her dearly, and probably let her get away with more than she should. We just can't seem to help ourselves when it comes to spoiling her. She's just so stinking cute!


She's at that stage where she wants to do everything for herself. She climbed in that great-big swing all by her little self. What a sense of accomplishment she must have felt! In the picture, she's looking around to see if anyone was watching... would hate for anyone to have missed her moment of glory!


Here she is in her very own car. She thinks it's just like mommy's and doesn't understand why she can't go anywhere she wants to. I really must keep my eye on this one... she'd be off to the fabric store without me. We both love shopping for fabric, and yarn, and other pretty things.


Wednesday, April 16, 2008

Vertical Stripe Afghan WIP

Oh, I love these colors! This is an afghan I started last week using this tutorial from Bella Dia. It is an amazingly simple pattern that is fun and easy. It uses only 3 stitches - chain, single crochets, and double crochets. I made mine using a chain of 300 instead of the suggested 250 because I thought it looked a little short. Now, I wish I'd stuck with the shorter chain - it takes me about 30 min. to do a single row - and it looks a little long. Ha! It's all good, though. I'm still excited about these colors. And it's better to have a blanket that's too big rather than too small, right? You really should give this pattern a try.

This blanket is for my daughter... my son wants to know when I'll make him one. Looks like I'll be crocheting for a while! It's a good thing I found a pattern I like. Happy crocheting!

Tuesday, April 15, 2008

April Showers... May Flowers!

It has been cold, dreary, and overcast here the past few days. We even had a freeze warning last night. Let me tell you - that usually doesn't happen to us in Alabama during the month of April. It has been a shock to my system (and my family's - my oldest is home from school today with a sore throat and the little one is coughing) after enjoying weeks of gorgeous 80 degree days. I know, I shouldn't complain... I've seen the snow some of you are still enduring up north.


Kimona Red Celosia, Melampodium (yellow), Black Dragon Coleus, and Lilac Madness Petunias.

Fortunately for me, this cold snap will be out of here by tomorrow and I'll be able to get my hands dirty again. It's amazing to me how happy I feel when I'm digging, and pruning, and watering, and weeding. It's good for the soul. Gardening makes me happy. And when I'm happy, I'm a better mother. And a better wife. And a better friend. A better me.

Monday, April 14, 2008

Bonnie Blue Designs


This is the first clothing pattern I ever tried to sew. It is an excellent choice for beginners because it is completely detailed, illustrated, and easy to sew. It is fully lined so there is no need to finish seams. Just be sure your sewing machine is capable of producing buttonholes.


I made the blue gingham one first - it was to be an Easter gift for my nephew, but since it's way past Easter, we'll call it a Happy Spring gift. The second one is beautiful blue broadcloth which will be the perfect weight for our hot Alabama summers. It is a gift for my cousin's baby who is turning 1-year- old on Saturday. I especially love sewing for babies. Baby projects are so small that they seem to sew up in a snap. And since my little princess started toddling around, I'm only able to sew during her naps or at night. This is definitely one of my go-to patterns for gift giving.


Bonnie Blue Designs has a number of easy to sew and fully lined children's clothing patterns. Most of their patterns come with variations for boys and girls in sizes 1-6 (all in the same pattern package.) I really like that these patterns come printed on heavy weight paper. I don't feel like I must be super careful not to rip the pattern after repeated uses. This one is called Holly and Hunter.

Sunday, April 13, 2008

Behind the Curve

I have a confession... I am an avid blog reader. There are 10+ blogs that I keep up with on an almost daily basis. It's an addiction really. I can hardly wait until new things are posted and I am able to take a peek into the lives of people all over the world. People who I feel like I know. It really makes my life so rich to be able to learn and laugh with others in this way. So I have decided to take the plunge, even if I feel like I'm way behind the curve. Here goes...

I am a stay at home mom (what an oxymoron! I'm rarely at home) with two beautiful children. A boy - 6 1/2 yrs. old and a girl - 15 mos. old. I've been happily married for almost 11 years to my high school sweetheart. Life is good. God is good! I'm blessed to have a wonderful family and many good friends.

I'll have more to share later...