Wednesday, March 17, 2010

It’s raining, it’s pouring…

062

And the kids are NOT snoring. This Spring Break is quickly turning into a wash-out. I enjoy a good rainy day now and again, but this is a bit much. It was nice out yesterday, and we did get out and do a bit of garden shopping. Asparagus, blueberries, blackberries, grapes, kiwis, and raspberries were purchased. But, poor Sara Lynn just declared that this day was boring.

064

This is the second rainy day this week… and it’s just Wednesday!We had such high hopes of spending this week outside getting the garden beds planted, doing a bit of fishing, and jumping on the trampoline. Oh, well. It’ll all have to wait.

003

We’ve had fashion shows…

008   

Played more video games than I usually allow…

042

Baked some Apple Oat Muffins

055

Enjoyed a tea party or two…

056 

These muffins are really good. And good for you, too.

Go make some already! They’re super easy.

066

I love the way rain looks coming down across the water.

018

And I’m ecstatic now that the pear trees are in bloom. Now, if only the sun would make an appearance, we could get outside and enjoy this delicious taste of spring. Meanwhile, I’m off to do some puzzles with these antsy kids of mine.

Tuesday, March 16, 2010

4:00pm… Spring Break 2010

086

Well, no one seemed to mind that our first day of Spring Break was spent indoors. The weather was overcast, misting rain at times, so the day was perfect for this…

087

and this…

116

and even this…

117

While everyone else was busy catching a few zzz’s, Mama spent the afternoon in her kitchen happily trying new recipes. I have more delicious goodness to share with you soon.

Yep. It was a good day.

I’ve been itching to do a little sewing lately, but to be honest, it’s just too hard on my neck to stay at the machine very long. I’m having what I hope will be the last surgery on my neck Monday. Hopefully, I’ll be able to do all the things I want to do very soon.

Monday, March 15, 2010

My Favorite Whole Grain Sandwich Bread and Cinnamon Rolls (or Sticky Buns)

 050

The secret to really good whole wheat sandwich bread that is moist and soft is allowing it to rise properly. I allow this dough to rise four times. It’s also important to knead your dough long enough. This can take quite a while if you’re kneading by hand.

When I knead by hand, I knead for 15 minutes, allow my dough (and me!) to rest for 10 minutes, and then knead for 15 minutes more. These days, I prefer to use my KitchenAid’s dough hook attachment and allow it to knead for 10-15 minutes, or until the dough appears somewhat smooth and elastic.

For the 1st rise, place the dough into a bowl with a tablespoon or two of EV olive oil. Turn the dough to coat all sides, cover with a damp towel, and allow it to rise in a warm place until doubled in size, about 1 – 1 1/2 hours.

For the 2nd rise, punch dough down gently, turn it over, cover, and allow it to rise again until doubled. This usually takes half the time of the first rise.
007

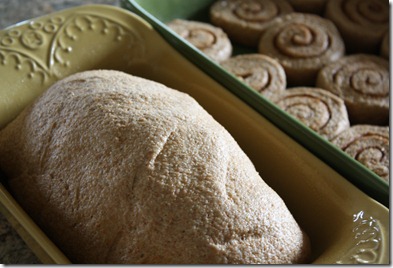
For the third rise, punch dough down gently once more, divide and shape as desired (above I used half the dough for a sandwich loaf and the other half for cinnamon rolls), and place in pans, again covered with a towel, to rise until almost doubled, about 20 minutes.

The forth rise happens during the first 5 minutes of baking.

035

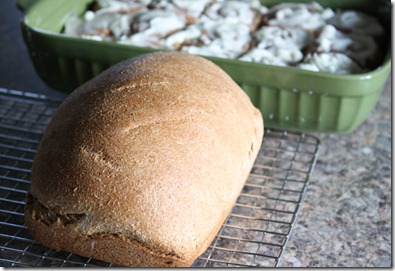
You can see here what a difference it makes in the final product. Mmmm….

015

I try to keep my cinnamon rolls somewhat healthy by not using too much sugar, and the sugar I use is organic evaporated cane juice. I usually use 1/2 cup of sugar and a tablespoon of cinnamon for the filling, and 8 ozs. of cream cheese whipped with 1 cup of confectioner’s sugar for the topping. Sometimes we drizzle honey over the top instead.

Feel free to experiment with your own ideas. More ideas here.

 040

Oh, my! These are sooooo delicious!

049 

Is your mouth watering yet? Mine is!

072

Here’s the recipe I adapted from Sue Gregg’s Whole Grain Baking Cookbook:

Whole Grain Dough

1 cup hot water

3/4 cup plain yogurt, whey, kefir, buttermilk,      ~ or 1/2 cup lemon juice (I prefer Stonyfield Creamtop Plain Yogurt)

4 cups whole wheat flour, spelt, or kamut  (I substitute 1/2 cup of soy flour for extra protein, and use half spelt/half wheat mix)

Mix above ingredients, cover tightly with plastic wrap, and allow to stand overnight. (This is optional, and I sometimes forget to do this the night before. The bread is still delicious when prepared the same day. Soaked grains are easier to digest.)

1 cup warm water

1 TBSP active dry yeast (or 1/4 oz packet)

1/2 tsp. honey

1/2 tsp. baking soda (added after mixture bubbles)

Mix above ingredients and let stand for 5 – 10 minutes, until frothy.

1/3 cup extra virgin olive oil

1/3 cup honey

2 tsp. sea salt

Mix above ingredients and add it, flour mixture, and yeast mixture to a mixing bowl. Knead by hand (or machine) until well blended. Turn out onto floured surface (if hand kneading) and knead for 20-30 minutes, until smooth and elastic. If kneading by machine, knead for 10-15 minutes.

1-2 cups whole wheat, spelt, or kamut flour

You may add up to 2 additional cups of flour to dough as needed to prevent sticking while kneading. I usually add about 1 cup of flour, only adding enough to allow dough to pull away cleanly from sides of mixing bowl. If you add to much flour, your dough will be dry and tough!

***Follow the directions at the top of this post for rising.

This recipe makes 2 loaves, or 1 loaf and one pan of cinnamon rolls.

Bake at 350 degrees for 35-45 minutes (or until the loaf sounds hollow when you thump it) for loaves, and 20-25 minutes for cinnamon rolls. Enjoy!

027

TIPS: If you need instructions on assembling the cinnamon rolls, try here. Instead of cutting with a knife, I use a piece of string (fishing line or dental floss work best!) slid gently beneath the log of dough, and then pulled crosswise across the top. It makes the cleanest cut. And I cook all my bread in stoneware pans. It cooks more evenly without allowing the bottom to become too brown. Don’t forget to spray or grease the bottom of your pans!

How to knead

How to shape loaves

Understanding yeast

Thursday, March 11, 2010

Decision made: Canon EOS Rebel XS

050

It’s a done deal. I am now the owner of a Canon EOS Rebel XS. It came with two lenses, bonus Canon bag, and an in depth instruction manual (which I will rely heavily upon!) I’m excited about learning to use this DSLR camera, but must admit that it is a bit intimidating. So, if my shots around here over the next few weeks are less than perfect… you’ll know why!

043

Tonight, I’ve folded my favorite quilt, put away my flannel pajamas, and settled  into my favorite chair wearing springtime pajamas. The windows and screened doors are open, and it feels so good to have a comfortably cool breeze blowing through the house. This amazingly beautiful, 75 degree day has motivated me to learn to use this camera in record time.

020

All of the trees show visible budding, and I can hardly wait to plant my spring garden! I’m ready, are you?

Wednesday, March 10, 2010

Camera-less

 137

I dropped my beloved Nikon last week, so I’m on the hunt for another camera today. I’m thinking about splurging on my first DSLR, but I’m undecided at this point. I’ve really enjoyed my P90… it was a great camera that served me well. My only complaint was the quality of low-light shots. They turned out quite grainy.

Decisions, decisions. What’s a girl to do?

On another note, I came across an older gentlemen selling this Yellow Root Tea. I don’t imagine I’ll drink it, but it was an interesting local find. What can I say… I’m a sucker for the unusual!

Tuesday, March 9, 2010

Refreshing Your Sourdough Starter

009

Leftover starter can be stored in your refrigerator for a few weeks, or longer in your freezer. When you’re ready for more sourdough bread, you’ll need to refresh the starter. It’s easy.

001

You should have reserved 1 quart of starter from your last batch. Remove the lid from your jar of leftover starter, place your starter in a large bowl, and allow the starter to come to room temperature.  Add one cup of rye flour plus enough water to make the mixture soupy each day, changing to a clean bowl, until 3 quarts are obtained. This takes about 3 days. Be sure that your starter goes through the bubbly, frothy stage again, and then it’s ready to use.

It’s important to remember to feed your starter at approximately the same time each day, and to store it in a warm, open area. That’s a little difficult to do if the weather isn’t warm, but on top of your refrigerator or beside a sunny window work well. I have a smooth, glass top stove which I allow my bowl to rest on after I’m done cooking and the glass is still warm. You don’t want to allow your starter to get too hot though. So, be careful if you do this.

028

There’s nothing quite like fresh sourdough bread. We enjoyed it last night sliced and topped with pizza sauce, cheese, hard salami, and mushrooms. Toasted in the oven for 10 minutes, it was an easy and delicious meal in minutes. We’ve also enjoyed it with apple butter or strawberry jam in the mornings. Divine! And it’s equally good with just a little butter alongside a bowl of chili or soup. Here are the links:

Sourdough Bread Starter

Easy Sourdough Bread

This is a very versatile bread, and it’s delightfully simple to make. I hope you enjoy it as much as we have!

Monday, March 8, 2010

Almost Spring

 160

We’re in countdown to Spring mode around here lately.

120

The pear trees are on the verge of flowering.

131

The fig trees and their early buds survived our crazy, snowy weather last month.

130

An old pail stands ready after years of collecting figs. We’re incredibly happy to be here.

134

Even the plum and apple trees have sent out buds in anticipation of warmer days ahead.

132

My raised beds (look deep into the background) have been built and filled with composted garden soil. This hill of red clay dirt epitomizes Alabama. You can’t go very far around here without seeing some of this stuff. I love to look at it, but it doesn’t grow the best vegetables.

139

And here’s my sweet Sara Lynn, playing at dusk in her pajamas… just because it was a gorgeous day we didn’t want to end. I hope your weekend was as beautiful as ours! Even my husband’s tonsillectomy on Friday couldn’t keep us down. Thank God for liquid painkillers! : )

Wednesday, March 3, 2010

A Recipe: Easy Sourdough Bread

028

This bread is amazing… and so easy to make. It just takes a bit of preparation beforehand. You’ll need to make sourdough bread starter first.

001

On day seven, feed your starter as usual. I’ve found that a 5 lb. bag of rye flour is enough to make two batches of starter. It takes a lot of flour to make the starter. Your starter should have gone through the bubbly, frothy stage. If not, try making it again from scratch, and be sure you feed it at the same time everyday and store it in a warm, open place.

008

Now, it’s a messy job when you’re dividing the starter. I used my one quart measuring bowl which has a pour spout to transfer it to jars.

005

Save one quart of the starter to start a new batch of starter, and use the remaining 2 quarts to make your bread. This recipe makes 3 large loaves that will keep for up to a week without refrigeration. If you don’t need that much bread at one time, or if you don’t have a HUMONGOUS dough bowl to mix it in, I would suggest using 1 quart of starter and halving this recipe (Half = 6 1/2 cups flour, 1 1/4 TBSP salt, 1/2 cup water, 1 quart starter).

009

I store my starter in the refrigerator in recycled glass jars. You could also freeze it, but be sure to leave plenty of head space in your jar. You also don’t want your starter to come in contact with metal.

006

Now, to make the bread, I use freshly milled spelt. You could also use whole wheat or kamut, but spelt gives the best loaf. It seems to rise better and make a slightly lighter loaf than whole wheat.

011

Add 1 cup of water and 2 1/2 TBSP salt to starter and stir until salt crystals dissolve. Slowly begin adding 13 cups of flour, stirring with a wooden spoon. Towards the end, it will be easier to mix with your hands. After all of the flour is incorporated, you may need to add an additional 1/2 cup of water if your dough is too thick. The dough should be soft, sticky, and pretty easy to knead.

012

Knead the flour right in your bowl, for about 15 minutes. This dough is stickier than most doughs I’ve kneaded, so don’t be alarmed. If you’re new to bread making and need a kneading tutorial, here's a good one with pictures. Just know that this dough will not be as smooth as the one pictured because they’re using white flour.

017

Do not punch the dough down. Gently pinch apart and shape into 3 loaves, or 5-6 smaller loaves. Cut slits in the top, cover with a dish towel, and let rise for 4-12 hours (it depends on how warm your house is.) You may bake in loaf pans or on a large sheet pan.

023

Man, oh man, was that a lot of dough!

I will probably do half as much next time.

027

I turned my oven on for 5 minutes, turned it off, and allowed my dough to rise (covered with a towel) inside my closed oven for 4 hours. When your dough has doubled in size, cook it at 350 degrees for 1 hour. If you like, rub butter over the top of the hot loaves after cooking.

064

I wish you were here to smell and taste this sourdough bread! Quite honestly, it is the very best bread I’ve ever tasted. And I’ve made many, many loaves of bread. It’s heavier than traditional sandwich bread, but has a wonderful heartiness and pleasantly sour taste. I’m serving it up tonight with a bowl of homemade chili. Yum!

Tuesday, March 2, 2010

Making Sourdough Bread Starter

Sourdough and Kitchen Before 018

Making sourdough bread starter is really easy. All you need are two LARGE bowls, a wooden spoon, measuring cup, cheesecloth (or flour sack type kitchen towel), a bag of rye flour (milling your own rye would be even better!), and some water. It takes 7 days before your starter will be ready for baking bread.

Sourdough and Kitchen Before 023

On day one, mix 2 cups of rye flour (you could use whole wheat flour, but rye gives the most consistent results) with 2 cups of cold filtered water. Be sure not to use metallic bowls or utensils.

Sourdough and Kitchen Before 040

Cover bowl with cheesecloth or a towel, securing with a rubber band if necessary, and leave in a warm place (the top of your refrigerator or beside a sunny window both work well if your kitchen is cool) for 24 hours.

082 This is what my starter looked like before feeding it on day three.

Everyday, for the next 6 days, feed your starter (at approximately the same time of day) 1 cup of rye flour and enough water to make the mixture soupy again. Usually, 1 – 1 1/2 cups of water will do.

086

Stir with a wooden (or plastic) spoon and transfer mixture to a clean bowl.

181

This is what my starter looked like before feeding it on day six. See all those bubbles? That’s what you want. It’s fermenting and that’s what will make your bread rise and taste yummy. It should have a slightly sour, wine-like aroma.

On day seven, feed it as usual, and the starter is ready for making bread. Save 1 quart of starter for your next batch of starter. If you’re not going to use the next batch of starter right away, store it in an airtight container in the refrigerator or freezer.

To start a new batch, place the starter in a bowl and add 1 cup of rye flour plus water each day, changing bowls, until 3 quarts are obtained.

This recipe was adapted from my Nourishing Traditions cookbook. I can’t tell you enough about how wonderful this book is!!! It is my go-to cookbook. Very different from your usual cookbooks. Sally Fallon explains the ‘why’ to her recipes and offers a new (which is actually the way of old traditions) way to eat healthy. She encourages making everything from scratch. Yes, everything! Even things like crackers, ketchup, mustard, and of coarse, sourdough bread. This way, you know exactly what you’re eating. No harmful preservatives or icky additives.

I’ll share my Nourishing Traditions recipe for sourdough bread with you tomorrow!

Monday, March 1, 2010

My Singer (K-series) Sewing Machine

095

Unfortunately, I have discovered that there isn’t a lot of information out there on my old Singer sewing machine.

094

What I do know is that it is a Singer K-series: K619639. These machines were manufactured in Elizabethport, NJ from 1902-1903. I haven’t had any luck finding replacement parts or a manual, but I haven’t given up on that. You never know what you might come across on eBay. 

100 104

Even if we are unable to restore this sewing machine to good working condition, it is such a wonderful piece of history to have in our home. The kids and I have very much enjoyed ‘playing’ with it, and seeing the old treadle foot pedal propel the machine.

040

I can’t imagine ever parting with it, and I am extremely grateful that my dear husband knows just how to make this girl happy.