

It was a cold, dreary day on Saturday. Perfect weather for sewing! I grabbed my coffee and headed upstairs to sew.

I was shocked to realize that this is the last size of Jackie Clark’s Britches and Bloomers that Sara Lynn will be able to wear. This pattern has been a staple in her wardrobe since she was a wee little thing. I’m saddened by this, but happy to know that I can convert other pants patterns to have a ruffle. Tutorial here.

I thought I’d share how I trace my patterns with you. I know there may be a few beginner seamstresses out there who may benefit from this. First of all, I never, ever cut the original pattern. It lasts longer if it is kept intact, and you will not have to worry about losing any pieces. I like to use a king size Sharpie marker to trace the pattern onto craft paper (which I buy by the roll at my local craft store – it’s very inexpensive). It’s a little more difficult to see the pattern through the craft paper, but it’s worth the extra effort because the paper will withstand repeated use. And the wide tip marker gives me a little more control while tracing.

Just be careful with the Sharpie, lest you mar the surface of your faithful sewing machine like I did. Ughh! I used some fingernail polish remover, but it didn’t come completely clean. They are permanent markers after all.

After I’ve traced my pattern, I copy all the information from the pattern onto the paper. I use bold handwriting, and I circle the size.

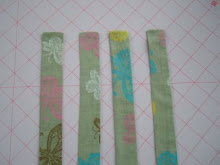
Next, I pin the corners and start cutting. I can’t stress enough how important it is to use good scissors that are dedicated to fabric cutting. I like the ones with titanium blades.

And I love my Rowenta professional iron. It presses through stiff creases in fabric like a hot knife through butter.

While we’re talking tools, I have to say that my rotary cutter, mat, and rulers have all become indispensable. I don’t know how I ever lived without them.

Moving on, I must confess that I have this love/hate thing going on with my serger. I love serging seams, but I hate threading it. I have yet to successfully thread it without pulling out my manual, which really irritates me. And it’s one of the easiest threading sergers available.

While sewing, I find it helps to have a good sense of humor. Mistakes are inevitable. I do some of the craziest things! Just look at that ruffle beautifully sewn to the wrong side of that stripey fabric. Uh-oh!

Time to break out the handy-dandy seam ripper. I keep meaning to pick up one of those ergonomically designed ones, seeing as to how I use mine so often. ; )

I find it’s all worth it to be able to sit back and admire the finished project. Love those serged seams!

And I’m really digging this fabric. The top is the Holly Jumper by Bonnie Blue Designs. It can be worn with a long-sleeved shirt underneath until it warms up.

The essential spring outfit.

Yes, it seems my little seamstress would like a few more pairs of those ruffley pants. Can you blame her? So cute.


2 comments:
use a white board marker..color the entire sharpie mess and wipe it should take it off. it's worked for me =). love the site. i visit to get inspired on my sewing projects =)
White board cleaner or even hairspray should remove marker marks.
Post a Comment